

Google Shopping ads grab attention instantly. They showcase your products with compelling images, prices, and your store name right in search results. Setting up these powerful visual ads might seem complex at first. But don't worry – this guide breaks everything down into manageable steps.
I've helped numerous eCommerce businesses implement Google Shopping campaigns that drive qualified traffic and sales. The visual nature of these ads creates immediate product recognition. Let me walk you through the entire process from start to finish.
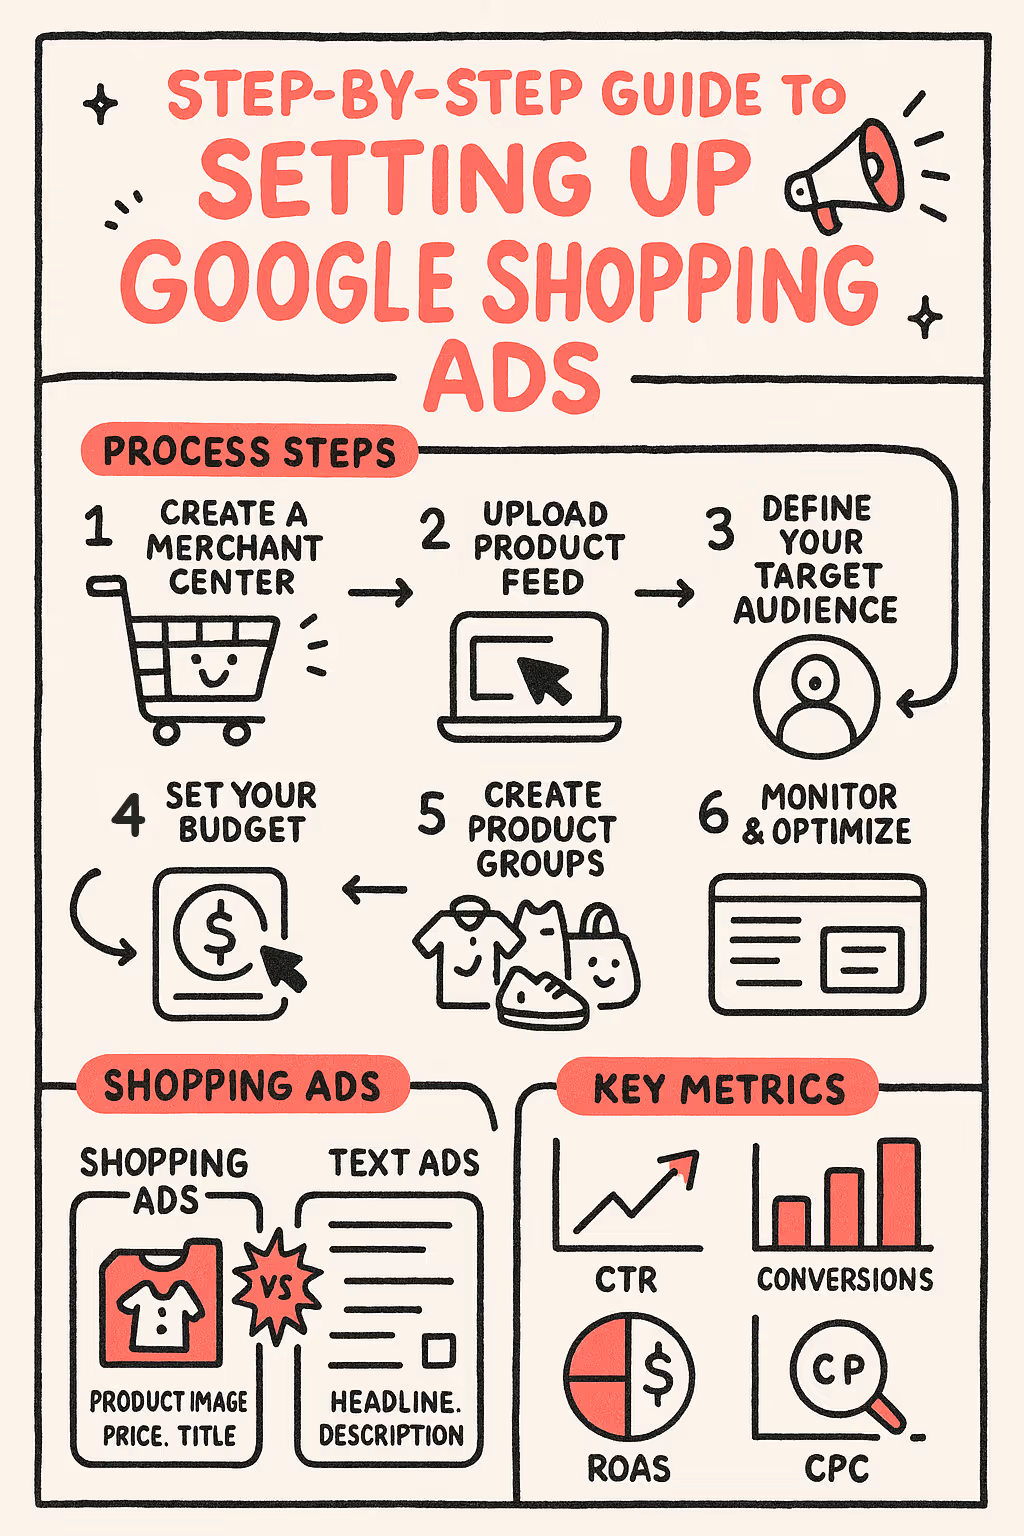
By the end of this guide, you'll have a complete understanding of how to set up Google Shopping ads effectively. Each step builds on the previous one. Let's get started.
Google Shopping ads display your products directly in search results. Unlike text ads, they show product images, prices, and your store name automatically. These visual ads appear when someone searches for products you sell. Google determines when to show them based on your product data.
These ads work differently than standard text ads. You don't select keywords directly. Instead, Google matches your products to relevant searches based on your product feed information. This approach makes accuracy in your product data absolutely essential.
Shopping ads perform remarkably well for eCommerce businesses. The average Click-Through Rate (CTR) for Google Shopping Ads is 0.86%, showing strong engagement with shoppers. (Source: Bind Media)
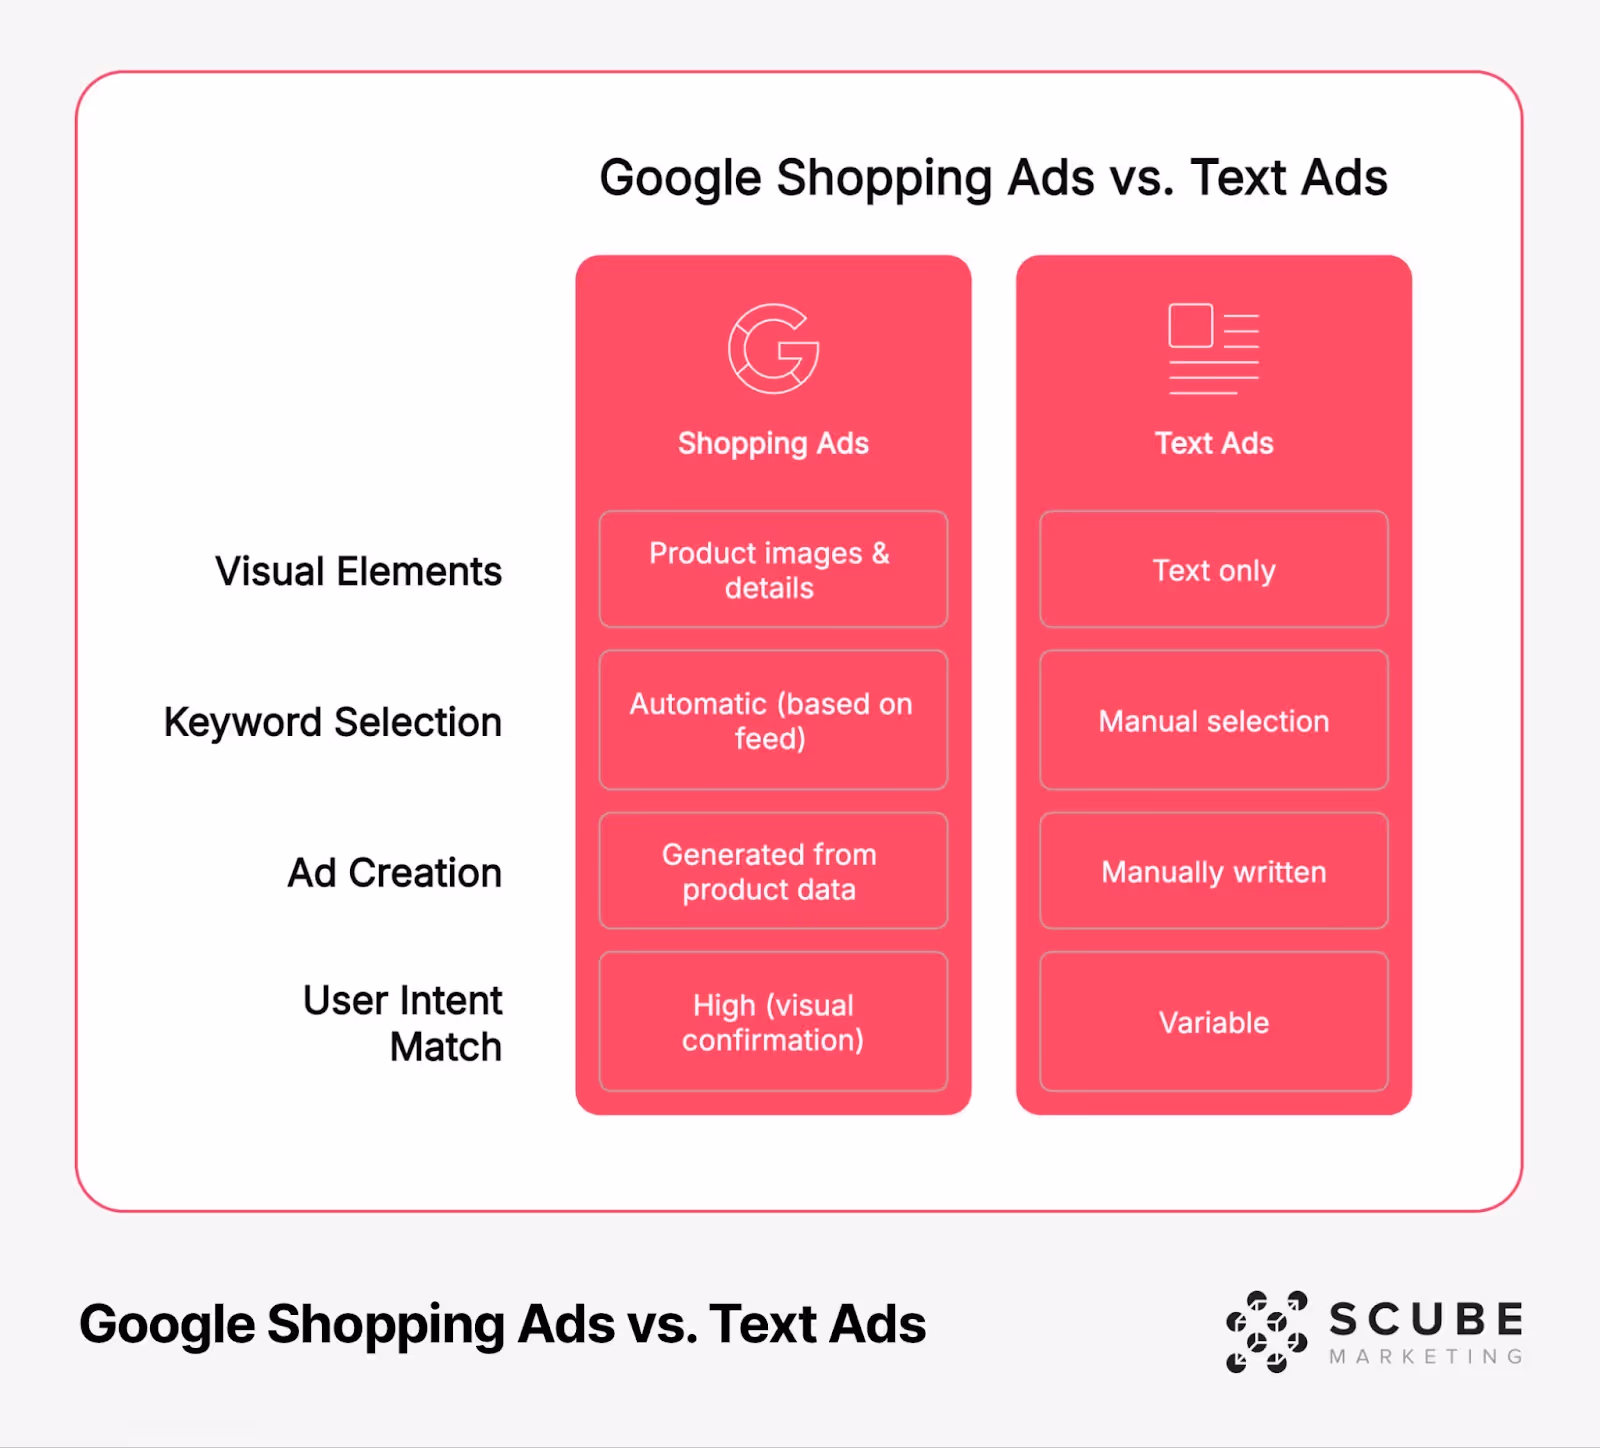
Let's compare Google Shopping Ads with traditional text ads to understand their unique advantages:
This comparison shows why Shopping ads often deliver stronger results for product-based businesses. The visual format helps shoppers make purchase decisions faster.
Shopping ads offer several major advantages for eCommerce stores. They provide immediate visual impact that text simply can't match. Potential customers see your products before clicking, improving traffic quality significantly.
These ads deliver impressive results for businesses. The average Google Shopping Ads conversion rate is 1.91%, demonstrating their effectiveness in driving actual sales. (Source: The Media Captain)
Here are the key benefits that make Shopping ads essential for online retailers:
When I work with eCommerce clients, Shopping ads consistently deliver strong returns. Their visual nature creates immediate product recognition. This translates to higher-quality traffic and better conversion rates.
Successful Google Shopping campaigns need proper preparation. Before diving into the setup process, ensure you have all the necessary elements in place. This groundwork prevents frustrating roadblocks later on.
First, you'll need active Google accounts. This includes both a Google Ads account and a Google Merchant Center account. The Merchant Center houses your product data, while Google Ads manages your campaigns and bidding.
Your website must meet several specific requirements. Google has strict policies about the sites that can use Shopping ads. These focus on transparency, security, and user experience.
Here's a pre-setup checklist to ensure you're ready to launch Google Shopping ads:
These requirements ensure transparency for shoppers. Google wants users to have good experiences after clicking on Shopping ads. Your site must deliver on this expectation.
Website quality directly impacts Shopping ads approval. Google reviews your site carefully before allowing your products to appear in Shopping results. Several key elements need special attention.
Product pages require specific information. Each product should have clear images, accurate descriptions, pricing, and availability status. Missing details can lead to disapprovals or poor ad performance.
Your checkout process needs security measures. All transaction pages must use HTTPS encryption to protect customer data. Missing security certificates will prevent Shopping ads approval.
Mobile responsiveness matters enormously. More than half of Google searches happen on mobile devices. Your product pages must function perfectly across all screen sizes.
I've seen many businesses struggle with disapprovals due to website issues. Taking time to fix these elements upfront saves countless headaches later. Consider it essential preparation for Shopping ads success.
The Merchant Center forms the foundation of your Shopping ads. This platform houses all your product data and connects it to Google Ads. Creating an account takes just a few minutes.
Start by visiting the Google Merchant Center website. Click the "Create Account" button and enter your business information. Include your store name, country, and timezone accurately. These details affect how your products appear.
The setup process includes several important sections. You'll need to provide business information, verify and claim your website, set up tax settings, and configure shipping details. Each element must be completed properly.
Website verification proves you own the site. Google provides several methods for verification, including HTML tag, Google Analytics, and Google Tag Manager options. Choose the method that works best for your technical capabilities.
Google provides detailed instructions for creating a Merchant Center account in their official documentation, making the process straightforward for beginners. (Source: Google Support)
This table outlines the key components of your Merchant Center setup. Pay special attention to the common issues column to avoid these typical problems.
Looking for a clear, connected view of how auto parts marketing actually works across SEO, PPC, feeds, and marketplaces? Explore our complete guide to auto parts marketing and ecommerce →
Verification problems happen frequently. If your HTML tag verification fails, try alternate methods like Google Analytics or Google Tag Manager. Sometimes switching verification methods resolves stubborn issues.
Website claim errors can be frustrating. The most common issue occurs when someone else has claimed your domain. Contact Google Merchant Center support if you encounter this problem. They can help resolve ownership disputes.
Policy violations often surprise new advertisers. Google maintains strict requirements for business transparency. Common policy issues include missing contact information, unclear return policies, or unsecured checkout processes.
For complex problems, contact Google support directly. The Merchant Center has a dedicated support team accessible through the help section. They typically respond within 24-48 hours to resolve issues.
In my experience, most Merchant Center problems stem from incomplete information. Double-check each section for thoroughness. Small oversights can delay your entire Shopping ads launch.
Your product feed represents the foundation of Shopping ads success. This structured data file contains all information about your products. Google uses it to determine when and where to show your ads.
The feed contains specific attributes for each product. Some attributes are required, while others are optional but recommended. Required attributes include product ID, title, description, link, image link, availability, price, and brand.
You have multiple options for creating your feed. Small businesses with few products might manually create a spreadsheet. Larger stores typically use automated feed generation through their eCommerce platform or third-party tools.
According to datafeedwatch, the quality of your product feed directly impacts your Shopping ads performance, with optimized feeds seeing up to 57% more conversions than basic ones. (Source: Datafeedwatch)
The following table shows the essential product feed attributes you must include:
After creating your feed, submit it to Merchant Center. You can upload it manually or set up automatic fetching from a hosted location. Regular updates keep your product information accurate.
Titles make or break Shopping ad performance. Include the most important details in the first 70 characters. I recommend using this formula: [Brand] + [Product Type] + [Key Attributes]. This structure maximizes relevance.
Images need special attention for Shopping ads. Use high-quality photos against white backgrounds. Show products clearly without text overlays or watermarks. Multiple images help, but your primary image must meet Google's requirements.
Descriptions should be detailed yet concise. Include key features, materials, dimensions, and use cases. Avoid promotional language like "free shipping" in descriptions. Google prefers factual product information here.
Here are essential optimization tips for your product feed:
Product categories require careful selection. Use Google's product taxonomy for precise categorization. The right category improves ad targeting and performance. Be as specific as possible rather than using general categories.
Linking your accounts connects your product data to your advertising campaigns. This essential step enables you to create Shopping campaigns in Google Ads. The process takes just a few minutes.
Start in your Merchant Center account. Navigate to the three-dot menu, then select "Account linking." Click the "Link account" button and enter your Google Ads customer ID. This 10-digit number identifies your Ads account uniquely.
Next, switch to your Google Ads account. Accept the link request that appears in your notifications. If you don't see it, check the "Tools & Settings" menu, then "Linked accounts," and finally "Google Merchant Center."
Successful linking shows confirmed status in both accounts. You'll see "Active" status in your Merchant Center account links section. In Google Ads, the Merchant Center appears under linked accounts with a green "Connected" indicator.
If linking fails, verify both accounts use the same email domain or have proper administrative access. Account permissions often cause linking problems. Ensure you have admin rights on both accounts before attempting to link them.
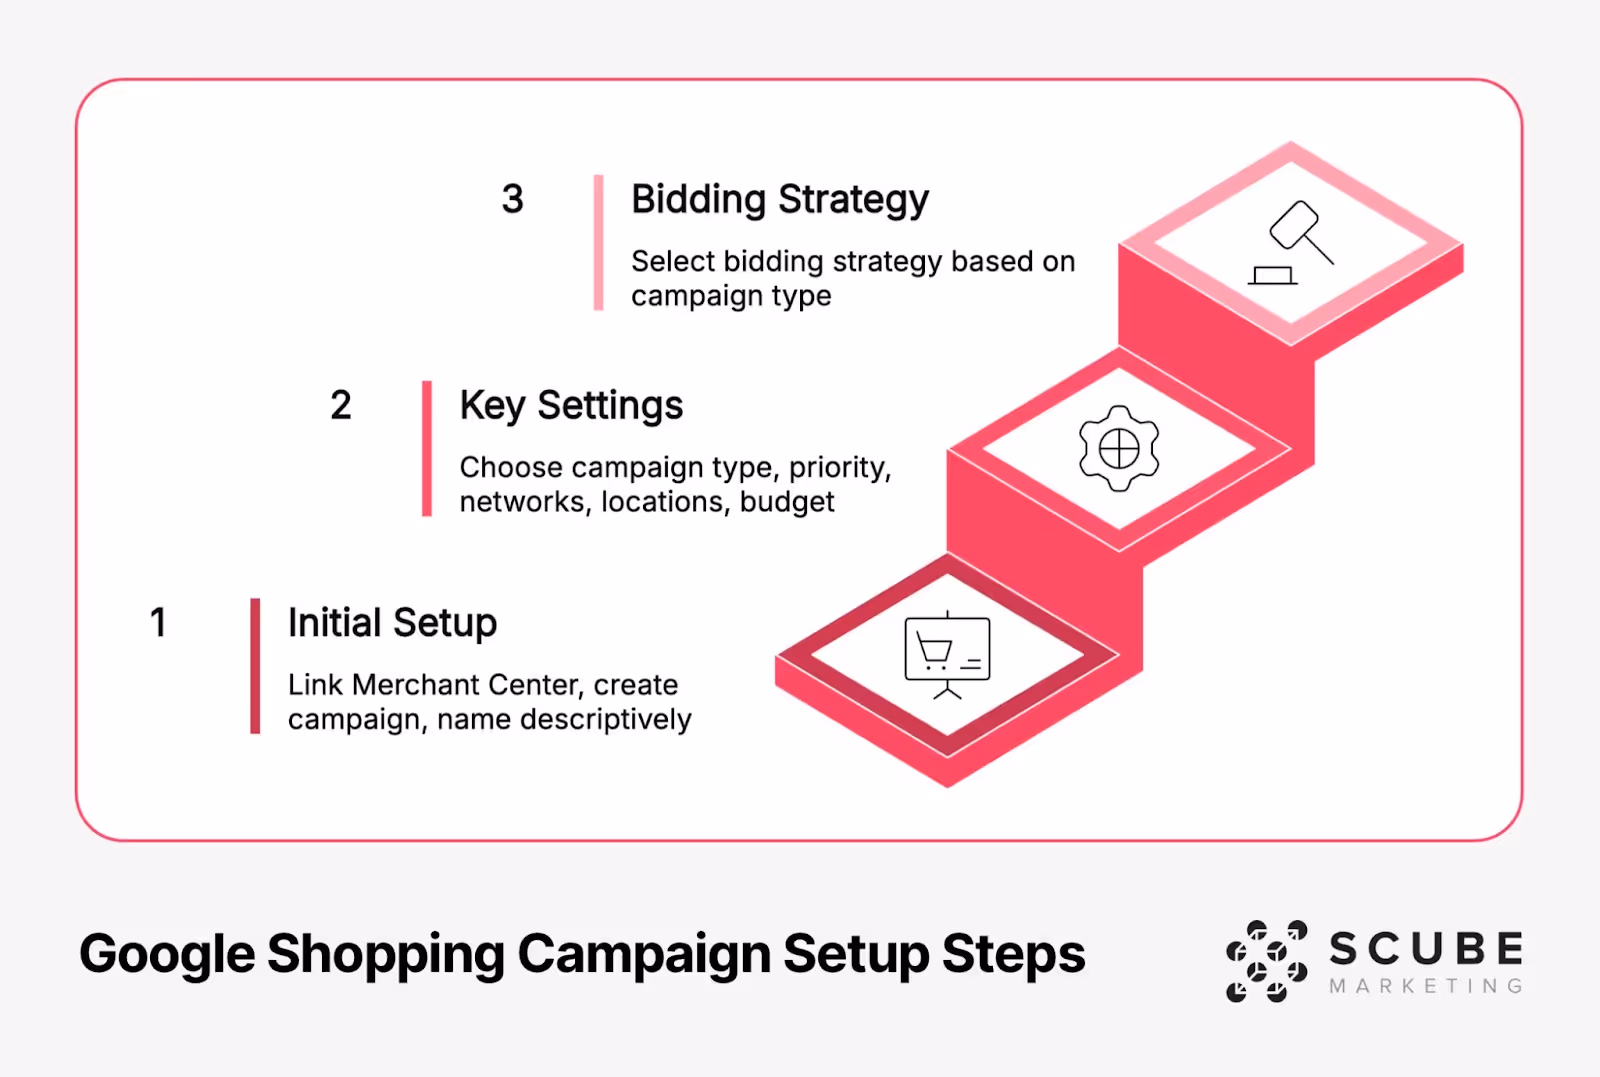
Shopping campaigns control how your product ads appear. Creating your first campaign sets the foundation for advertising success. The process involves several key decisions about structure and settings.
Start in Google Ads by clicking "Campaigns," then the blue plus button. Select "New campaign" and choose "Shopping" as the campaign type. Connect your Merchant Center account when prompted. This pulls in your product data.
Name your campaign descriptively. I recommend including the product category and campaign purpose, such as "Mens Shoes - Standard Shopping" or "Electronics - Smart Shopping." Clear naming helps when you have multiple campaigns.
Campaign structure affects performance significantly. You have two main options: Standard Shopping or Performance Max (formerly Smart Shopping). Standard gives you more control, while Performance Max uses automation for placements across Google properties.
The campaign structure you choose can significantly impact your advertising results. Different structures work better for different business models and product types.
Budget settings require careful consideration. Start conservatively while you gather performance data. You can always increase budgets for campaigns that perform well. I typically recommend starting with 2-3 times your target cost per acquisition.
Bidding strategies control how much you pay for clicks. Google offers several automated bidding options for Shopping campaigns. Each serves different business objectives.
Maximize clicks works well for new campaigns. This strategy gets your ads maximum exposure while respecting your budget. It helps gather initial performance data before switching to more advanced strategies.
Target ROAS (Return on Ad Spend) suits established campaigns. This strategy aims for a specific return on your advertising investment. For example, setting 400% ROAS targets $4 in revenue for every $1 spent on ads.
Maximize conversion value balances volume and efficiency. This strategy tries to get the highest total conversion value within your budget. It works well for stores with various product price points.
Which bidding strategy should you choose? The data shows that different strategies perform better depending on your business goals and historical performance.
For new campaigns, start with manual CPC or maximize clicks. These strategies give you more control while building performance history. After collecting 2-4 weeks of data, consider switching to an automated bidding strategy.
Product groups determine how your items are organized within campaigns. Proper organization allows for targeted bidding and performance analysis. Think of it as creating logical folders for your products.
By default, Google creates one product group called "All products." This lumps everything together with the same bid. For most stores, this approach proves too broad and inefficient.
Instead, subdivide your products into meaningful groups. Common segmentation methods include brand, category, product type, or price points. The right approach depends on your store's unique inventory.
Creating logical hierarchies improves campaign management. For example, you might first divide by category (Shoes, Clothing, Accessories), then by brand within each category, and finally by price ranges. This structure enables precise bid adjustments.
For most advertisers, I recommend starting with category-level groupings. This provides a balance between granularity and manageability. As you gather data, you can further subdivide high-performing or high-value categories.
Item ID grouping offers maximum control. This approach creates individual product groups for your best-selling or highest-margin items. It allows for product-specific bid adjustments based on performance and profitability.
Brand-based organization works well for stores with distinct brand performance. Some brands may convert better or have higher margins. This structure lets you allocate budget accordingly.
Price-based segmentation makes financial sense. Higher-priced items typically justify higher bids because of their profit margins. You might group products into price bands like $0-25, $26-50, $51-100, and $100+.
Performance-based adjustments come after collecting data. Once you identify which product groups perform best, you can increase bids on winners and decrease bids on underperformers. This optimization should happen regularly.
When working with clients, I often find a hybrid approach works best. Start with broader categories, then progressively refine your structure as performance data reveals patterns. Flexibility matters more than perfect initial setup.
Negative keywords play a crucial role in Shopping campaigns. They prevent your ads from showing on irrelevant searches. This improves efficiency by eliminating wasted spend on unqualified traffic.
Unlike standard search campaigns, Shopping campaigns don't use traditional keywords. However, negative keywords still apply. They block your ads from appearing when certain terms are searched.
Research negative keywords through search term reports. After running your campaign for a week or two, review the actual search queries triggering your ads. Look for irrelevant terms that waste your budget.
Common negatives include terms like "free," "cheap," "used," or "download." These typically indicate non-buying intent. Also consider blocking searches for product accessories if you only sell the main products.
Implement negative keywords at either campaign or ad group level. Campaign-level negatives apply to all products. Ad group negatives affect only specific product groups. Use campaign negatives for universally irrelevant terms.
Continuous monitoring drives Shopping campaign success. Regular performance analysis helps identify improvement opportunities. Set a schedule for reviewing key metrics and making adjustments.
Several metrics deserve special attention. Track conversion rate, click-through rate, impression share, and return on ad spend (ROAS). These indicators reveal overall health and areas needing improvement.
Google support forums provide valuable insight into performance evaluation. According to their documentation, you should evaluate a Shopping campaign's performance in relation to your specific business goals rather than industry benchmarks alone. (Source: Google Support)
Here's a practical optimization checklist for ongoing campaign management:
The performance metrics table below shows what to track and why each metric matters:
Bid adjustments should respond to performance data. Increase bids on product groups with strong ROAS. Decrease bids on underperforming groups. This strategic reallocation of budget maximizes overall campaign results.
Impression share reveals your market visibility. This metric shows the percentage of times your ads appeared versus how often they could have appeared. Low impression share may indicate budget constraints or poor feed quality.
Benchmark CTR compares your performance to competitors. Google provides category averages for click rates. If your CTR falls below benchmark, consider improving titles, images, or prices to stand out better.
Auction insights show direct competitor activity. This report reveals which other merchants appear alongside your products. High overlap with certain competitors may suggest targeting similar customers.
Understanding how your competitors structure their Shopping campaigns provides valuable strategic insights. This competitive intelligence helps you position your products more effectively.
I recommend reviewing competitive metrics monthly. These insights help contextualize your performance within the broader market. Sometimes external factors affect all advertisers in your category.
Product feed errors cause most Shopping ads problems. Common issues include missing required attributes, incorrect format, or outdated information. Regular feed maintenance prevents these errors.
Poor product images hurt performance significantly. Blurry photos, images with text overlay, or pictures showing multiple products violate Google's requirements. Clean, clear product images on white backgrounds work best.
Ignoring disapproved products wastes opportunity. Check your Merchant Center regularly for disapprovals. Fix these issues promptly to restore visibility. Even successful accounts face occasional disapprovals.
This table outlines common mistakes and their solutions:
Neglecting negative keywords leads to budget waste. Many advertisers set up Shopping campaigns but never review search terms. This oversight allows irrelevant traffic to drain your budget continuously.
Campaign structure issues include overly broad product groups. Without proper segmentation, high and low-performing products receive the same bid. This inefficiency reduces overall campaign performance.
When I audit client accounts, these mistakes appear repeatedly. Fixing them often yields immediate performance improvements. The good news? Most are relatively simple to correct once identified.
Tiered campaign structure maximizes budget efficiency. This approach uses campaign priority settings (high, medium, low) with different bidding strategies. It helps allocate budget to your best-performing products while maintaining visibility for others.
RLSA (Remarketing Lists for Search Ads) boosts Shopping performance. This strategy shows ads to previous site visitors or adjusts bids for these users. Since these people already know your brand, they typically convert at higher rates.
Showcase Shopping ads work well for general searches. These ads display multiple products from your store when users search broad terms like "men's shoes" rather than specific products. They're excellent for brand awareness.
Local inventory ads connect online shopping with local stores. If you have physical retail locations, these ads show when products are available nearby. They appeal to shoppers who want immediate pickup rather than waiting for shipping.
For established accounts, I recommend implementing these advanced optimization techniques to further improve performance after mastering the basics.
Seasonal bid adjustments account for changing competition. During high-volume periods like Black Friday or Christmas, consider increasing bids to maintain visibility. Return to normal levels when competition decreases.
Setting up Google Shopping ads requires attention to detail. Each step builds on the previous one to create a strong foundation. With proper setup, these visual ads can dramatically boost your eCommerce visibility and sales.
Remember that optimization never truly ends. Successful Shopping campaigns require ongoing monitoring and refinement. Regular performance reviews help identify opportunities for improvement.
The product feed remains your most important asset. Invest time in optimizing titles, descriptions, and images. These elements directly influence when and where your ads appear.
After completing this guide, take these next steps:
Google Shopping represents one of the most effective channels for eCommerce businesses. The visual format naturally attracts qualified shoppers. With proper setup and management, these campaigns can deliver exceptional returns.